RC Cruise Ship / Ferry Viking Grace (toy) by Depronized
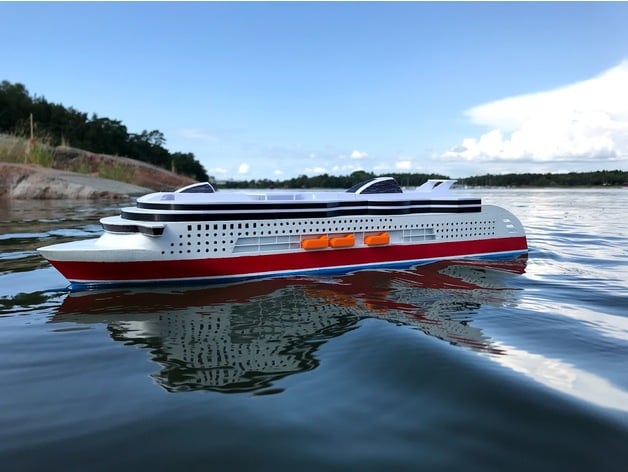
Project: convert a small RC-boy boat into a cruise ferry. Why? because my son loves the cruise ferries on the rout near our summer house. Catch, it had to be done from idea to finished boat in 4-5 days which meant I had to start printing the big hull parts while I was drawing the details... The model is based on the MS Viking Grace. It is a very large LNG-powered cruise ferry. Yes, it's called a cruise ferry because it both takes cruising passengers and cars/trucks. It's 218 meters long, roughly 32m wide and can take 2800 passengers and roughly 1,2km of ro-ro-lane. The route they traffic is a bit special. It's between Sweden and Finland going by the semi-autonomous island "nation" called Åland. Although being a part of Finland, it has it's own government. The special thing with this route is that even though Sweden and Finland are both members in the European Union, Åland as an autonomous region is not part of the EU VAT-area meaning these cruise ferries are allowed to sell tax-free goods as long as they come into a port in Åland along their route. Both Sweden and Finland are from a population point of view small countries, but because of the tax-free business and the resulting low ticket fees, these ferry routs has become very popular enabling the use of large ships. I used a side-view for the drawing in Fusion 360 and used mainly sculpting mode to draw the hull. The superstructure was then added using traditional methods. I widened the beam as well as enlarged the submerged part of the hull to increase the displacement to roughly 1,2kg. This makes a huge difference for the appearance in the water as it stabilizes the boat and prevents it from rolling in every little wave. But it means you need to put a lot of ballast in the hull to get the right water line. Length: 60cm Width: 12cm (at waterline). Weight: aprox 1,2kg to get the waterline right. (filament weight is only 200-300 grams though so you need to add a lot of ballast). This build is not complicated as I had a super-tight time schedule I could not incorporate a lot of detail. I have tried to save all the SLT's in the orientation they are supposed to be printed (except the plugs I see now, but you can turn them in the slicer, they are just for guiding the two center sections when gluing). In order to minimize possible leakage I made the rudder assembly so that the rudder shaft exit point is well above the water line which means you don't need to worry about sealing it. Layerhight for hull: 0,25mm (or finer if you have more time). I used PLA for everything and coated it with primer (sanded it) and two layers of cheap hobby spray paint. I know, it's a terrible paint job but I usually don't paint my models. :D Key features: Propeller shaft hole: 5mm Motor size: 20mm with flat sides (simple cheap DC-motor) Rudder shaft: 3mm (I used carbon fiber rod). This is heavy DIY and it's not meant to be a follow-along build with a finished shopping list. I don't recommend to use the equipment I used because that boat did not have reverse, which is needed for this model to be fun tu drive. I will change the RC-equipment in it for this reason. Tis was just installed to have a couple of days to drive it at the end of the vacation this summer. It's not a complicated print so I recommend printing the parts and then you can start measuring and play around with what you should put into it. It's easy to just melt-glue in wood pieces to accommodate the servos of your choice, or another motor. The supersturcture parts can be printed using filament-swap to reduce the amount of painting required: Black: 0 - 7mm White: 7 - 10mm Black: 10 - 16mm white: 16 - (If you use PrusaSlicer or any other slicer where you can directly enter filament changes, just enter changes at 7mm, 10mm and 16mm. ).
Thingiverse